WhatsApp Template Management
This documentation covers details of the WhatsApp API documentation
- REST API components & How to read them
- WhatsApp Templates - things to know
- WhatsApp Templates API Management
- Send Template Messages
- vCX WhatsApp Onboarding & Messaging
- WhatsApp Coexistence - FAQs
REST API components & How to read them
REST APIs are the most prevalent and user-friendly type of APIs you will most likely encounter. As a product manager, you play a pivotal role in working with your engineering team to bring digital solutions to life, and a fundamental part of that collaboration is understanding REST APIs.
In this document, you’ll learn how to break down REST APIs into their essential components so you can confidently discuss, dissect, interact with, and debug them.
A brief intro to REST APIs
REST APIs are a set of rules and conventions that define a standardized way for requests and responses to be structured and exchanged. They are based on the principles of REST, a software architectural style for designing networked applications. You’ll also hear the term RESTful APIs in relation to REST APIs.
Here are a couple of examples of RESTful rules and conventions followed by REST APIs (not important to memorize, just to give you an idea of what these rules look like):
- Client-server: Separation of concerns whereby the user interface concerns (client) are separate from the data storage concerns (server).
- Stateless: Each request from the client to the server must contain all of the information necessary to understand and complete the request. The server cannot use previously stored context information on the server.
REST APIs make extensive use of HTTP (Hypertext Transfer Protocol) as the foundation for communication between clients (like web browsers or mobile apps) and servers (where the API is hosted).
The majority of what you need to know about APIs are related to HTTP and it’s components. We can broadly bucket the components into the API Request and API Response:
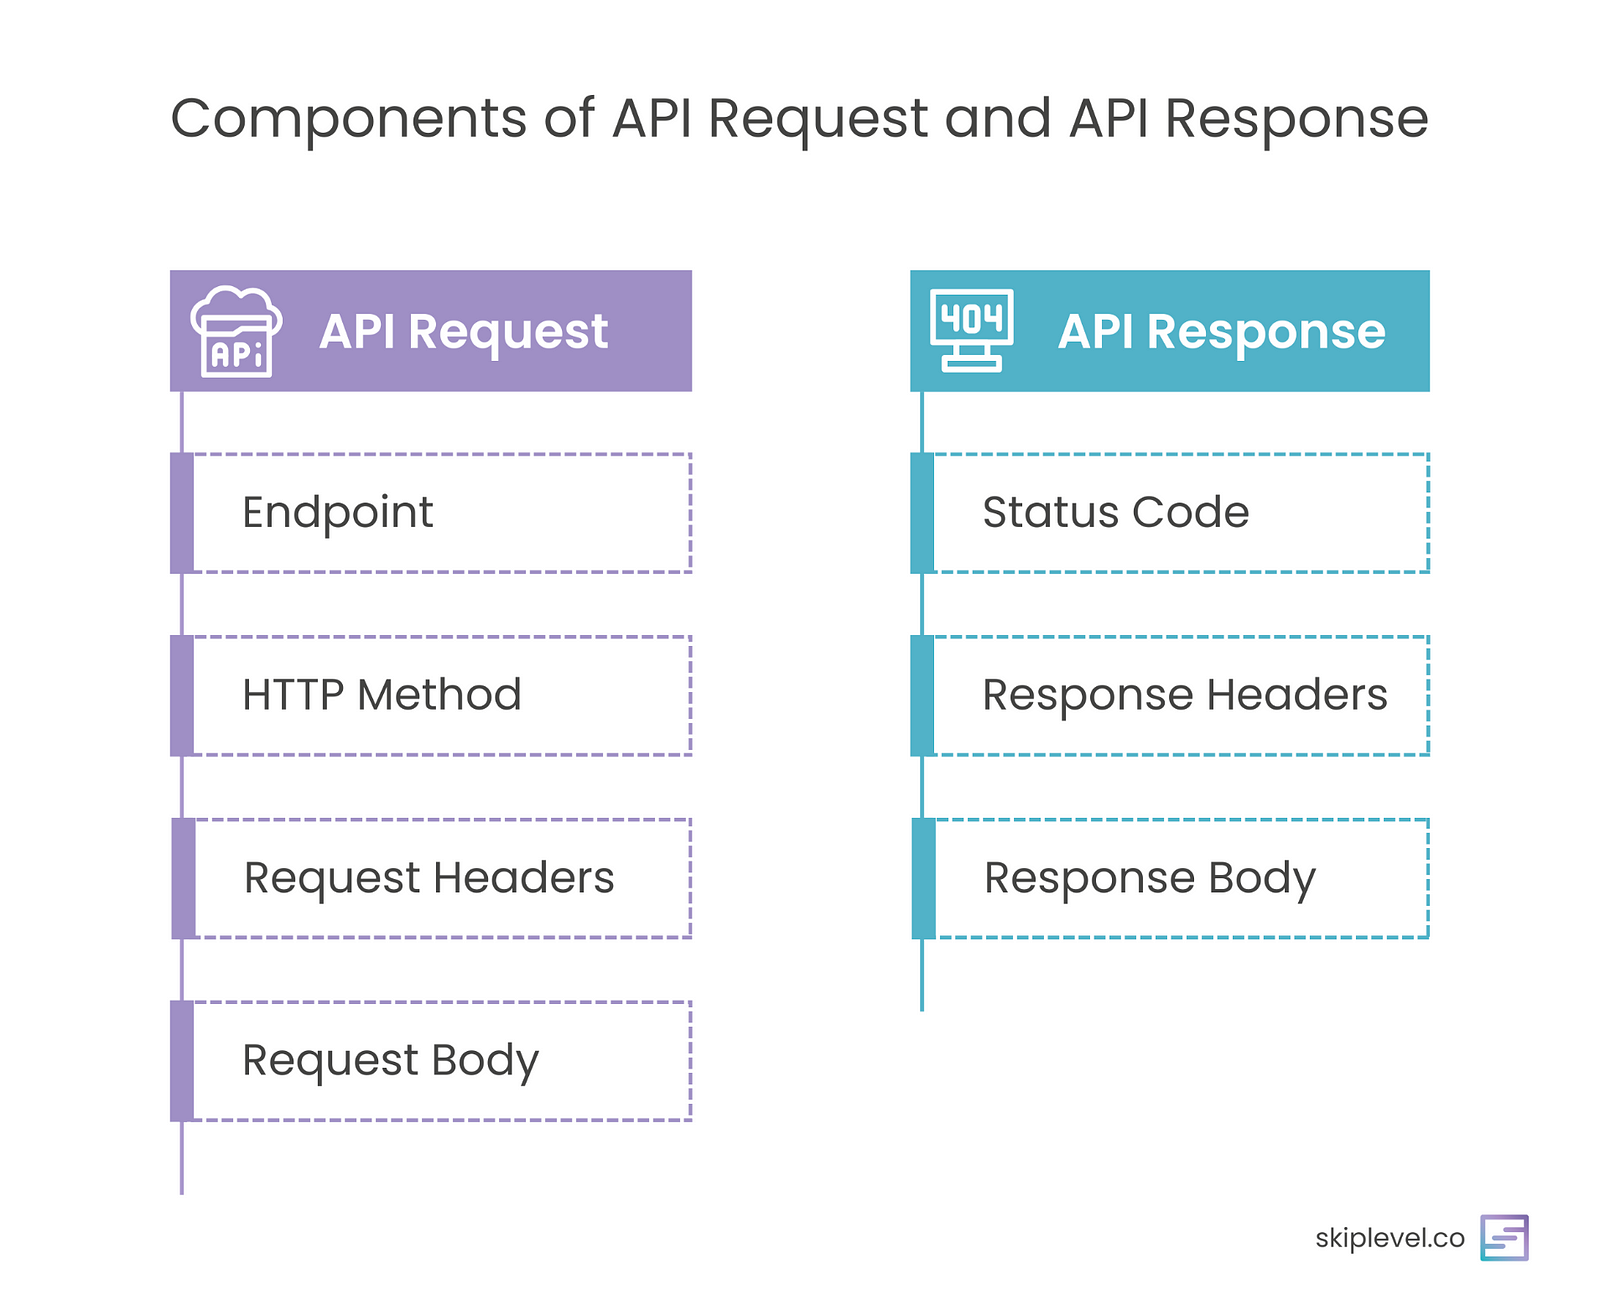 Components of an API Request and API Response
API Request
When you make a request to an API, you’re essentially saying, “I want to do something or get something from this endpoint.” Requests consist of the following components:
1/ API Endpoint
An endpoint is the specific location aka the access point to the API. Think of it as an address for a particular service or resource. These endpoints are usually represented as URLs (Uniform Resource Locators), making them easy to understand. The API endpoint is made up of the “ Base URL” plus the “path” of the API.

2/ HTTP Methods
HTTP (Hypertext Transfer Protocol) methods are the actions you can take when interacting with an API. There are 8 request types but 4 are the most commonly used:
- GET: This method is like asking for information. When you send a GET request to an API’s endpoint, you’re requesting data, like retrieving weather information for a specific location.
- POST: When you send a POST request, you’re submitting data to the API which adds new data to the database. This could be creating a new user account or adding a comment on a blog post.
- PUT: Use the PUT method to update existing data. For instance, you might change your profile picture on a social media app.
- DELETE: As the name suggests, the DELETE method is for removing data. If you want to delete a post or an account, you’d use this method.
You’ll likely see all 4 HTTP methods being used at some point, but out of the 4, you’ll see the GET and POST method most frequently and those are the two that you should be most familiar with.
Two quick side notes:
- The POST and PUT methods are often used interchangeably. The difference has to do with something called idempotency which is very technical and not worth diving into.
- You’ll also see the same POST API sometimes used to both add new data and update existing data. Developers may decide to design the API this way to be more efficient as opposed to creating and managing two separate APIs in the business logic: one POST and the other PUT.
3/ Request Headers
Request headers convey additional information about the API request, such as the format in which the client expects the response (e.g., JSON or XML), authentication credentials, caching instructions, and more.
Here’s an example using APIs on Amazon:
Accept-Language: en-US
Authorization: Bearer YourAccessTokenHere
Content-Type: application/json
Host: www.amazon.com
Origin: https://www.amazon.com
Referer: https://www.amazon.com
User-Agent: Mozilla/5.0 (Macintosh; Intel Mac OS X 10_15_7) AppleWebKit/537.36 (KHTML, like Gecko) Chrome/117.0.0.0 Safari/537.36
Information in the request header can be used for a number of reasons including:
- Authenticating the request: There are various authentication methods, such as API keys, OAuth tokens, and username/password combinations. For example, credentials for your bank account so the API is authorized to make changes to your account.
- Caching instructions: Temporarily storing data in a cache for improved future performance/latency.
- Logging: All systems keep a log of events that occur in a computer system. Information stored in the headers (i.e. location of request origin, browser information, date & time of request, etc..) are logged in log files. The information in the log files can then be used for a variety of reasons: debugging, metrics, and telemetry. Accept-Language: en-US
Authorization: Bearer YourAccessTokenHere
4/ Request Body
When you need to send data to the server, you include it in the request body. The data is typically in a structured format like JSON or XML. This is common when creating new records or updating existing ones. The request body is akin to a letter with the information you want to submit.
For example: Amazon has an internal API that adds a new product into the database.
POST https://products.amazon.com/api/2017/add
{
  "product_name": "Smartphone",
  "price": 499.99,
  "description": "A high-quality smartphone with advanced features.",
  "category": "Electronics",
  "availability": true
}
API Response
Once you send a API request, you’ll receive an API response. This response contains the data or information you requested, as well as metadata about the response itself. It consists of the following components:
1/ Status Code
This is a three-digit number that tells you the outcome of your request. Status codes are like short, standardized messages that quickly convey whether your request was successful, encountered an issue, or faced an error. All status codes are divided into 5 categories but you’ll only really encounter 4 of them:
- 2xx: Success — The API request was successful! e.g. 200 OK, 201 Created
- 3xx: Redirection — The API request has more than one response. e.g. 301 Moved Permanently, 302 Found
- 4xx: Client Error — Some information provided in the request was wrong or missing. e.g. 400 Bad Request, 401 Unauthorized
- 5xx: Server Error — Something went wrong on the server and the request wasn’t successful. e.g. 501 Internal Server Erorr, 502 Bad Gateway
Here are some examples of common status codes:
- 200 OK: Your request was successful, and you’ll find the data you wanted in the response.
- 201 Created: This code typically appears after a successful POST request, indicating that the resource you requested has been created.
- 400 Bad Request: If the API couldn’t understand your request, you might see this code.
- 401 Unauthorized: When you lack proper authorization or credentials to access the requested data, this code appears.
- 404 Not Found: This indicates that the endpoint or resource you’re looking for doesn’t exist.
- 500 Internal Server Error: If something goes wrong on the other island (the API’s server), you might see this code.
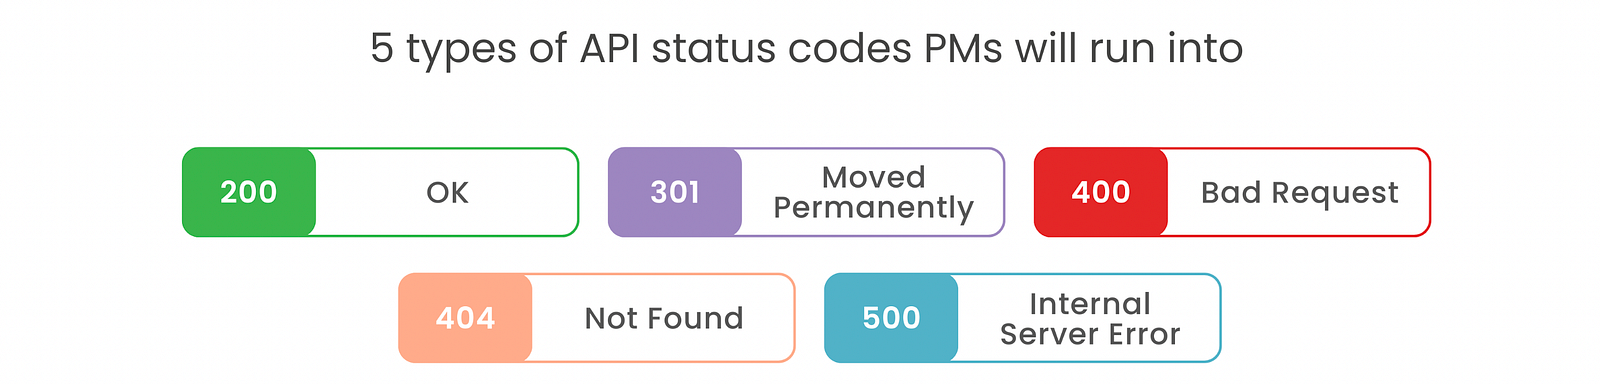 Common API status codes
2/ Response Headers
Similar to request headers, response headers provide additional information about the response, such as the type of data you’re receiving (e.g., JSON or XML), the server’s version, and more.
Here’s an example:
Access-Control-Allow-Origin: www.amazon.com
Content-Length: 22
Content-Type: application/json
Date: Mon, 30 Oct 2023 16:32:01 GMT
3/ Response Body
This is where you’ll find the actual data or information you requested. Like the request body, the response body is often in JSON format for easy readability and parsing.
Using the same API example as the one in the request body, here’s what a successful response where the product was successfully added to the database might look like. Notice the API response returned a newly created product_id uniquely assigned to the added product.
200 OK POST https://products.amazon.com/api/2017/add
{
  "product_id": 12345,
  "message": "Product 'Smartphone' has been successfully added."
}
Conclusion
We’ve covered the crucial parts of the API and you now have all the information you need to confidently discuss, dissect, interact with, and debug APIs.
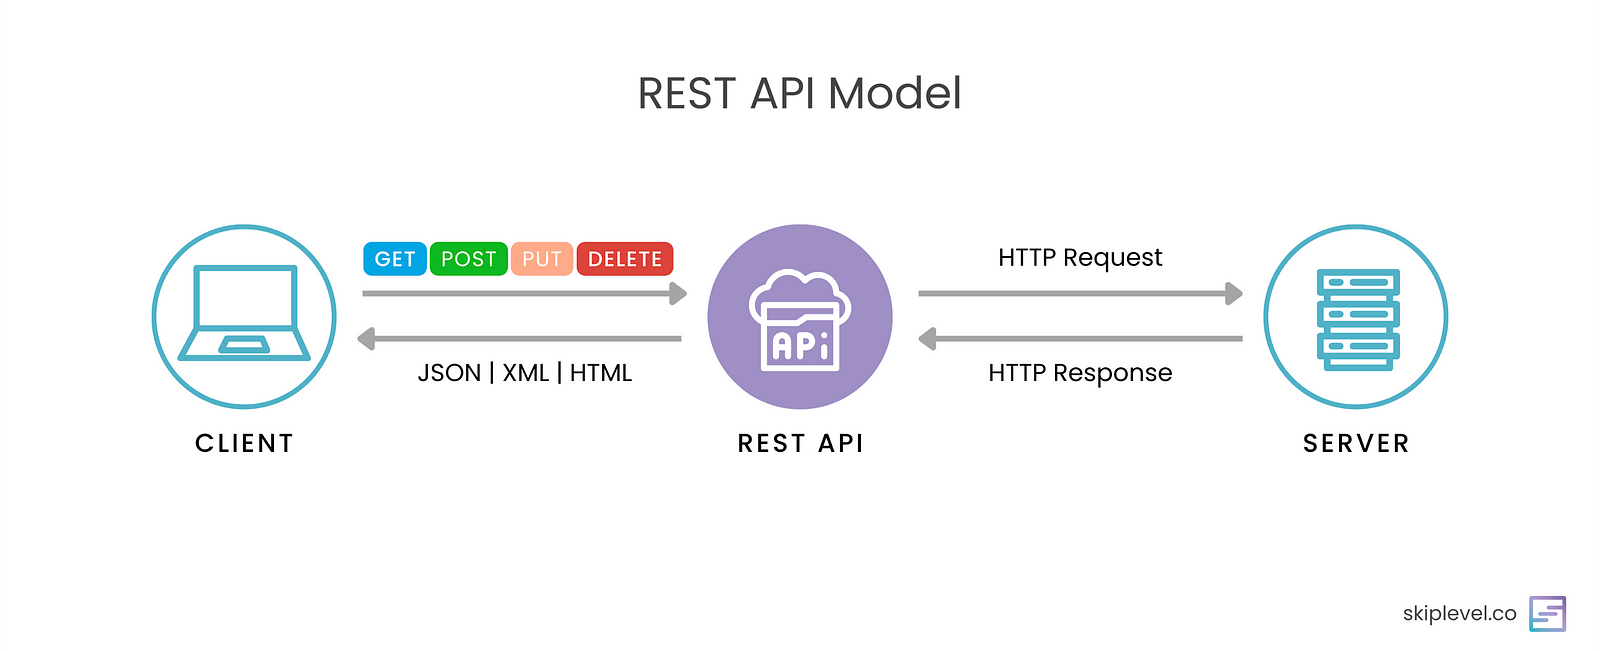 REST API Model
WhatsApp Templates - things to know
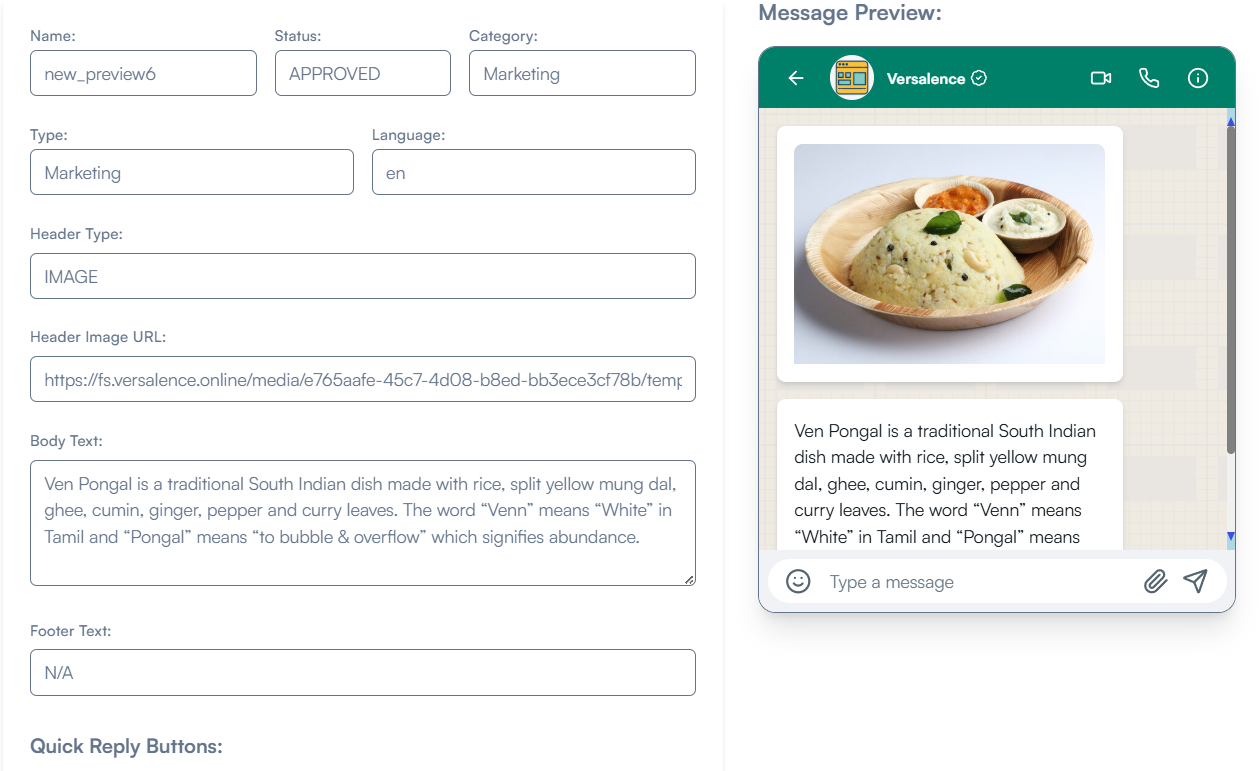
Templates
Templates are used in template messages to open marketing and utility conversations with customers. Unlike free-form messages, template messages are the only type of message that can be sent to customers who have yet to message you, or who have not sent you a message in the last 24 hours.
Templates must be approved before they can be sent in template messages. In addition, templates may be disabled automatically based on customer feedback and engagement. Once disabled, a template cannot be sent in a template message until its quality rating has improved or it no longer violates our business or commerce policies.
Creation
Use the template creation API to create templates.
Approval Process
Once you have created your template you can submit it for approval. It can take up to 24 hours for an approval decision to be made. Once a decision has been made, a notification will appear in your Broadcast Templates Manager.
If your message template is approved, its status will be set to ✅Approved and you can begin sending it to customers. If it is rejected, its status will be set to ❌Rejected. The template has to be deleted and wait for 24 hours to reapply again with the same template name.
Multiple templates of the same name can be created by changing the template language
Samples
If your template uses variables you must include sample variable values (media assets, text strings, etc.) with your submission. This makes it easier for us to visualize how your template will appear to customers.
To include a sample with your submission in the WhatsApp Manager, first create your template, add any variables that it requires, and then click the Add Sample button. The preview pane will render any sample media assets or sample text values you provide.
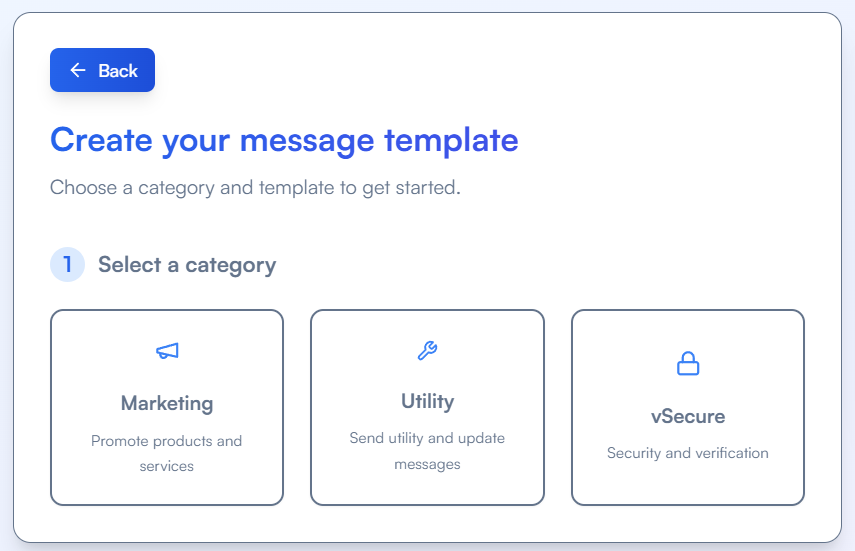
If using our APIs to create templates, include the examples property for each template component object in your request that uses a variable.
Common Rejection Reasons
Submissions are commonly rejected for the following reasons, so make sure you avoid these mistakes.
- Variable parameters are missing or have mismatched curly braces. The correct format is
{{1}}. - Variable parameters contain special characters such as a
#,$, or%. - Variable parameters are not sequential. For example,
{{1}},{{2}},{{4}},{{5}}are defined but{{3}}does not exist. - Template contains too many variable parameters relative to the message length. You need to decrease the number of variable parameters or increase the message length.
- The message template cannot end with a parameter.
- The message template contains content that violates WhatsApp’s Commerce Policy: When you offer goods or services for sale, we consider all messages and media related to your goods or services, including any descriptions, prices, fees, taxes and/or any required legal disclosures, to constitute transactions. Transactions must comply with the WhatsApp Commerce Policy.
- The message template contains content that violates the WhatsApps Business Policy: Do not request sensitive identifiers from users. For example, do not ask people to share full length individual payment card numbers, financial account numbers, National Identification numbers, or other sensitive identifiers. This also includes not requesting documents from users that might contain sensitive identifiers. Requesting partial identifiers (ex: last 4 digits of their Social Security number) is OK.
- The content contains potentially abusive or threatening content, such as threatening a customer with legal action or threatening to publicly shame them.
- The message template is a duplicate of an existing template. If a template is submitted with the same wording in the body and footer of an existing template, the duplicate template will be rejected.
WhatsApp Templates API Management
The template APIs allow you to create, delete, and fetch templates
The templates API supports the following methods and are client specific
- GET
- POST
- DELETE
Get all templates
curl --location 'https://api.versal.one/<client-id>/templates' \
--header 'Authorization: Bearer <client-token>'
Get a template by name
curl --location 'https://api.versal.one/<client-id>/templates?name=order_delivery_1' \
--header 'Authorization: Bearer <client-token>'
Create a template
To create a template - the following components are required
- name - template name [cannot contain Upper case, space, special characters] can contain underscore "_" and a max of 25 characters
- language - en [English], en_US [English US]. Click here for the complete list
- category - Marketing/Utility
- components - Header, Body, Footer
for more details check the official documentation on the META website
curl --location 'https://api.versal.one/<client-id>/templates' \
--header 'Authorization: Bearer <client-token>' \
--data '{
    "name": "order_delivery_1",
    "language": "en_US",
    "category": "Marketing",
    "components": [
        {
            "type": "HEADER",
            "format": "Text",
            "text": "header text"
        },
        {
            "type": "BODY",
            "text": "This is a {{1}}",
            "example": {
                "body_text": [
                    [
                        "random text"
                    ]
                ]
            }
        },
        {
            "type": "FOOTER",
            "text": "lasadoasi"
        },
        {
            "type": "BUTTONS",
            "buttons": [
                {
                    "type": "PHONE_NUMBER",
                    "text": "Call",
                    "phone_number": "+918897229166"
                }
            ]
        }
    ]
}'
{
"message": "Template created successfully",
"response_text": "{\"id\":\"1179134613392693\",\"status\":\"APPROVED\",\"category\":\"MARKETING\"}",
"status": "200"
}Template Components
Templates are made up of four primary components which you define when you create a template: header, body, footer, and buttons. The components you choose for each of your templates should be based on your business needs. The only required component is the body component.
Some components support variables, whose values you can supply when using the Cloud API or On-Premises API to send the template in a template message. If your templates use variables, you must include sample variable values upon template creation.
Headers
Headers are optional components that appear at the top of template messages. Headers support text, media (images, videos, documents), and locations.
All templates are limited to one header component
Text Headers
You can choose to add header text to your message template. The message text in the header component accepts parameters for programmatic configuration.
Text parameters can be configured in one of two formats:
- Positional — Pass in an array of parameters that correspond to numeric positions in the body text with examples
- For example:
“Hello John, your account balance is {{1}}” | [ “$1,000” ]
- For example:
- Named — Pass in JSON objects that contain a parameter name and examples
- For example:
{ "param_name": "account_balance", "example": "$1,000" }
- For example:
Component Syntax
Add this header component object into the ”components”[] object array when calling the POST <WHATSAPP_BUSINESS_ACCOUNT_ID>/message_templates endpoint. Substitute the placeholder properties below using the properties table.
{
  "type": "HEADER",
  "format": "TEXT",
  "text": "<HEADER_TEXT>",

  "example": {
    "header_text": [
       // You must provide one of the inputs below when the <HEADER_TEXT> string contains parameters
       <POSITIONAL_PARAM_EXAMPLES>
       <BODY_TEXT_NAMED_PARAMS>
    ]
  }
}
Properties
| Placeholder | Description | Example Value |
|---|---|---|
|
|
Plain text string. Can support 1 parameter. If this string contains parameters, you must include the 60 character maximum. |
|
|
|
Required when using positional parameters in your header text. Array of The number of strings must match the number of variables included in the string. |
|
|
|
Required when using named variables in your header text. Array of JSON objects that contain
|
[{
 "param_name": "sale_start_date",
 "example": "December 1st"
}]
|
Positional Parameter Example
{
  "type": "HEADER",
  "format": "TEXT",
  "text": "Our new sale starts {{1}}!",
  "example": {
    "header_text": [
      "December 1st"
    ]
  }
}
Named Parameter Example
{
  "type": "HEADER",
  "format": "TEXT",
  "text": "Our new sale starts {{sale_start_date}}!",
  "example": {
    "header_text_named_params": [
      {
        "param_name": "sale_start_date",
        "example": "December 1st"
      }
    ]
  }
}
Media Headers
Media headers can be an image, video, or a document such as a PDF. All media must be uploaded with the Resumable Upload API. The syntax for defining a media header is the same for all media types.
Syntax
{
  "type": "HEADER",
  "format": "<FORMAT>",
  "example": {
    "header_handle": [
      "<HEADER_HANDLE>"
    ]
  }
}
Properties
| Placeholder | Description | Example Value |
|---|---|---|
|
|
Indicates media asset type. Set to |
|
|
|
Uploaded media asset handle. Use the Resumable Upload API to generate an asset handle. |
|
Example
{
  "type": "HEADER",
  "format": "IMAGE",
  "example": {
    "header_handle": [
      "4::aW..."
    ]
  }
}
Body
The body component represents the core text of your message template and is a text-only template component. It is required for all templates.
The message text in the body component accepts parameters for programmatic configuration.
Text parameters can be configured in one of two formats:
- Positional — Pass in an array of numbered positional parameters that correspond to numeric positions in the body text with examples
- For example:
“Hello {{1}}, your account balance is {{2}}” | [ “John”, “$1,000” ]
- For example:
- Named — Pass in JSON objects that contain a parameter name and examples
- For example:
{ "param_name": "order_id", "example": "335628"}
- For example:
All templates are limited to one body component.
Component Syntax
Add this body component object into the ”components”[] object array when calling the POST <WHATSAPP_BUSINESS_ACCOUNT_ID>/message_templates endpoint. Substitute the placeholder properties below using the properties table.
{
  "type": "body",
  "text": "<BODY_TEXT>",
  "example": {
    "body_text": [
      [
       // You must provide one of the inputs below when the <BODY_TEXT> string contains parameters
       <POSITIONAL_PARAM_EXAMPLES>
       <BODY_TEXT_NAMED_PARAMS>
      ]
    ]
  }
}
Properties
| Placeholder | Description | Example Value |
|---|---|---|
|
|
Plain text string. Can support multiple parameters. If this string contains parameters, you must include the 1024 character maximum. |
|
|
|
Required when using positional parameters in your body text. Array of string in which each string is meant to illustrate the text likely to be passed in as a parameter during message send time, for example a bank account balance, or a customer name. The number of strings must match the number of variables included in the string. |
|
|
|
Required when using named variables in your body text. Array of JSON objects that contain
|
[{
 "param_name": "order_id",
 "example": "335628"
},
{
 "param_name": "customer_name",
 "example": "Shiva"
}]
|
Positional Parameter Example
{
  "type": "BODY",
  "text": "Shop now through {{1}} and use code {{2}} to get {{3}} off of all merchandise.",
  "example": {
    "header_text": [
      "the end of August","25OFF","25%"
    ]
  }
}
Named Parameter Example
{
  "type": "BODY",
  "text": "Your {{order_id}}, is ready {{customer_name}}.",
  "example": {
    "header_text_named_params": [
      {
        "param_name": "order_id",
        "example": "335628"
      },
      {
        "param_name": "customer_name",
        "example": "Shiva"
      }
    ]
  }
}
Footer
Syntax
{
  "type": "FOOTER",
  "text": "<TEXT>"
}
Properties
| Placeholder | Description | Example Value |
|---|---|---|
|
|
Text to appear in template footer when sent. 60 characters maximum. |
|
Example
{
  "type": "FOOTER",
  "text": "Use the buttons below to manage your marketing subscriptions"
}
Buttons
{
  "type": "BUTTONS",
  "buttons": [
    {
      "type": "PHONE_NUMBER",
      "text": "Call",
      "phone_number": "15550051310"
    },
    {
      "type": "URL",
      "text": "Shop Now",
      "url": "https://www.luckyshrub.com/shop/"
    }
  ]
}
If a template has more than three buttons, two buttons will appear in the delivered message and the remaining buttons will be replaced with a See all options button. Tapping the See all options button reveals the remaining buttons.

Copy Code Buttons
Syntax
{
  "type": "COPY_CODE",
  "example": "<EXAMPLE>"
}
Properties
| Placeholder | Description | Example Value |
|---|---|---|
|
|
String to be copied to device's clipboard when tapped by the app user. Maximum 15 characters. |
|
Example
{
  "type": "COPY_CODE",
  "example": "250FF"
}
Delete a template
curl --location --request DELETE 'https://api.versal.one/<client-id>/templates?name=harsh45021279' \
--header 'Authorization: Bearer <client-token>'
Send Template Messages
While sending a template message, the template contents are not sent. To send a template message, its media link [public link] & variable values [if any] are sent along with the template name and language
Broadcast with caution - Do not spam. Spamming will lead to the degradation of service and WhatsApp number getting blocked
Sending Message
The template has no parameter
curl --location 'https://api.versal.one/<client-id>' \
--header 'Authorization: Bearer <client-token>' \
--header 'Content-Type: application/json' \
--data '{
    "purpose": "sendtemplate",
    "to": <recepient phone number>,
    "template": <template name>,
    "code": <language code>
}'

sample data
--data '{
    "purpose": "sendtemplate",
    "to": "919999900000",
    "template": "conv_start_hi",
    "code": "en_US"
}'
The template has image media
The image typically does not look like a regular parameter while creating the template. However, is a parameter
curl --location 'https://api.versal.one/<client-id>' \
--header 'Authorization: Bearer <client-token>' \
--header 'Content-Type: application/json' \
--data '{
    "purpose": "sendtemplate",
    "to": <recepient>,
    "template": "schedule",
    "code": "en",
    "components": [
        {
            "type": "header",
            "parameters": [
                {
                    "type": "image",
                    "image": {
                        "link": "https://cdn.anuhealthyfood.in/images/missyourorders.png"
                    }
                }
            ]
        }
    ]
}'
The link has to be publically accessible, or else the template won't be delivered to the user
The template has body parameters
curl --location 'https://api.versal.one/<client-id>' \
--header 'Authorization: Bearer <client-token>' \
--header 'Content-Type: application/json' \
--data '{
    "purpose": "sendtemplate",
    "to": <recepient>,
    "template": "schedule",
    "code": "en",
    "components": [
        {
            "type": "body",
            "parameters": [
                {
                    "type": "TEXT",
                    "text": "Hemant Suryavanshi"
                },
                {
                    "type": "TEXT",
                    "text": "Blue USB Microphone"
                },
                {
                    "type": "TEXT",
                    "text": "12/12/2024"
                }
            ]
        }
    ]
}'
In the above example, the template has three body variables. As depicted, only parameters are passed and not the entire body
The template has body parameters and image media
curl --location 'https://api.versal.one/<client-id>' \
--header 'Authorization: Bearer <client-token>' \
--header 'Content-Type: application/json' \
--data '{
    "purpose": "sendtemplate",
    "to": <recepient>,
    "template": "schedule",
    "code": "en",
    "components": [
        {
            "type": "header",
            "parameters": [
                {
                    "type": "image",
                    "image": {
                        "link": "https://cdn.anuhealthyfood.in/images/missyourorders.png"
                    }
                }
            ]
        },
        {
            "type": "body",
            "parameters": [
                {
                    "type": "TEXT",
                    "text": "Hemant Suryavanshi"
                },
                {
                    "type": "TEXT",
                    "text": "Blue USB Microphone"
                },
                {
                    "type": "TEXT",
                    "text": "12/12/2024"
                }
            ]
        }
    ]
}'
In the above example, there is an image and three body parameters in the template
Response
{
    "message": "Message sent successfully",
    "response_text": "{"messaging_product":"whatsapp","contacts":[{"input":"+16312924377","wa_id":"16312924377"}],"messages":[{"id":"wamid.HBgLMTYzMTI5MjQzNzcVAgARGBIxNEExODY3MjhGMDNGNDRBNjgA","message_status":"accepted"}]}",
    "status": "200"
}
vCX WhatsApp Onboarding & Messaging
 Base URL - Administration
https://backend.admin.versalence.online/api/v2All protected endpoints require:
Authorization: Bearer <JWT_TOKEN>1. Authenticate the customer admin
The customer’s admin user logs in with their vCX credentials. The returned JWT is used for all subsequent calls.
POST /api/v2/login
Content-Type: application/json

{
  "email": "admin@customer.com",
  "password": "CustomerAdminPassword"
}
Response:
{
  "success": true,
  "message": "Sign-in successful",
  "token": "<JWT_TOKEN>"
}
Notes:
- The user must have
email_verified = 'yes'. - The account must be
active. - The JWT expiry is controlled by the server (
JWT_EXPIRES_IN). - The JWT contains the company
uuid. The backend uses this to identify which company to onboard.
Create a Sub-Account Under an Agency
An agency account creates a sub-account by calling the standard onboarding endpoint. The agency relationship is implicitly derived from the JWT; there is no body parameter to set the parent agency UUID.
Headers
Authorization: Bearer <agency-account-jwt>
Content-Type: application/json
How the Agency Tag Is Derived
- The JWT
uuidclaim identifies the calling account. - The
cust_auth.authenticatemiddleware validates the token and callsMiddlewareCheckto verify that the UUID belongs to a company withis_agency = 'yes'. - If valid, the middleware sets
req.parent_uuidto the agency UUID. - The
SignUpControllerpasses that UUID asagent_uuidto the creation service, which writes it intocompany.parent_agency_uuid.
Request Body
{
  "name": "Sub-account Admin Name",
  "email": "admin@subaccount.com",
  "password": "securePassword",
  "company_name": "Sub Account Inc",
  "company_email": "info@subaccount.com",
  "company_type": "Agency Client",
  "phone_number": "1234567890",
  "address": "123 Main St",
  "industry": "Technology",
  "website": "https://subaccount.com"
}
Required Fields
| Field | Validation |
|---|---|
name |
Required |
company_name |
Required |
company_type |
Required |
email |
Required, valid email |
company_email |
Required, valid email |
password |
Required, 6–26 characters |
phone_number |
Required, 8–15 characters |
address |
Optional |
industry |
Optional |
website |
Optional |
Success Response — 201
{
  "success": true,
  "message": "User created successfully."
}
What Happens on the Backend
- A new UUID and
company_idare generated. - Records are inserted into
uuid_table,company, andcompany_users. company.parent_agency_uuidis set to the agency UUID from the JWT.- The first user is created with
user_role = 'admin',email_verified = 'yes', andfirst_admin = 'yes'. - Plan assignment: if the creator is not the Versalence super-account, the sub-account inherits the agency's current
company_plan_idfromcompany_subscription_current; otherwise it falls back toplan0.
Error Responses
| Status | Meaning | Frontend Handling |
|---|---|---|
400 |
Validation failed or duplicate user/company email | Show inline field errors |
403 |
Authorization header missing, invalid token, or account is not an agency | Redirect to login or show access denied |
500 |
Unexpected creation error | Show generic error and allow retry |
UI / Frontend Notes
addUser endpoint does not accept a parent agency UUID in the body. The frontend should only allow this action when the logged-in account is an agency, and it should rely on the agency's JWT to establish the relationship automatically.is_agency = yes can create sub-accounts via this flow. The configured VERSALENCE_UUID super-account is the only exception and can bypass the agency check.Recommended Page Structure
SuperAdminPanel
└── AgencyManagementPage
    ├── AccountSearch / AccountSelector
    ├── AccountDetailsCard
    │   ├── CurrentAgencyStatusBadge
    │   └── PromoteButton / DemoteButton
    └── ConfirmAgencyStatusModal

AgencyDashboard
└── SubAccountManagementPage
    ├── SubAccountList
    └── CreateSubAccountForm (calls POST /api/v2/addUser)
Environment Variables
| Variable | Purpose |
|---|---|
SUPER_ADMIN_UUID |
Overrides the default super admin UUID. |
VERSALENCE_UUID |
Bypasses the agency check for the master account. |
2. Get Agency Customers
GET /api/admin/v2/getCustomers
Authorization: Bearer <agency-jwt>
Response:
{
  "success": true,
  "message": "Customers retrieved successfully.",
  "data": [
    {
      "uuid": "...",
      "company_name": "...",
      "company_email": "...",
      "company_id": "AGTSW000012026",
      "account_status": "active",
      "parent_agency_uuid": "...",
      "company_member_since": "...",
      "user_name": "...",
      "user_email": "...",
      "user_phone": "...",
      "user_role": "admin",
      "user_status": "active"
    }
  ]
}
3. Login to Sub Account using company_id
GET /api/admin/v2/clientAgentLogin?client_id=<SUB_ACCOUNT_COMPANY_ID>
Authorization: Bearer <agency-owner-jwt>
How it works
- The agency owner logs in via
/api/admin/v2/adminLoginto get their own JWT. - They call
/api/admin/v2/clientAgentLogin?client_id=<company_id>with that JWT. - The backend validates that the requested account is actually a sub-account under the agency.
- It returns a JWT for the sub-account’s first admin user.
Example
GET /api/admin/v2/clientAgentLogin?client_id=AGTSW000012026
Authorization: Bearer <agency-owner-jwt>
Response:
{
  "success": true,
  "message": "User successfully logged in.",
  "token": "<sub-account-jwt>"
}
Base URL - Backend
https://backend.versalence.onlineAll protected endpoints require:
Authorization: Bearer <JWT_TOKEN>4. Check WhatsApp integration status
Use this to decide whether the customer still needs to onboard WhatsApp.
GET https://backend.versalence.online/api/v2/getWaba
Authorization: Bearer <JWT_TOKEN>
Not integrated response:
{
  "success": true,
  "message": "no whatsapp data found"
}
Already integrated response:
{
  "success": true,
  "message": "whatsapp data found",
  "data": [
    {
      "app_id": "...",
      "waba_id": "...",
      "access_token": "[hidden]",
      "phone_id": "...",
      "phone_number": "919876543210",
      "display_phone_number": "+91 98765 43210",
      "onboarding_mode": "standard",
      "is_active": true,
      "webhook_subscription_status": "subscribed"
    }
  ]
}
5. Launch Meta Embedded Signup
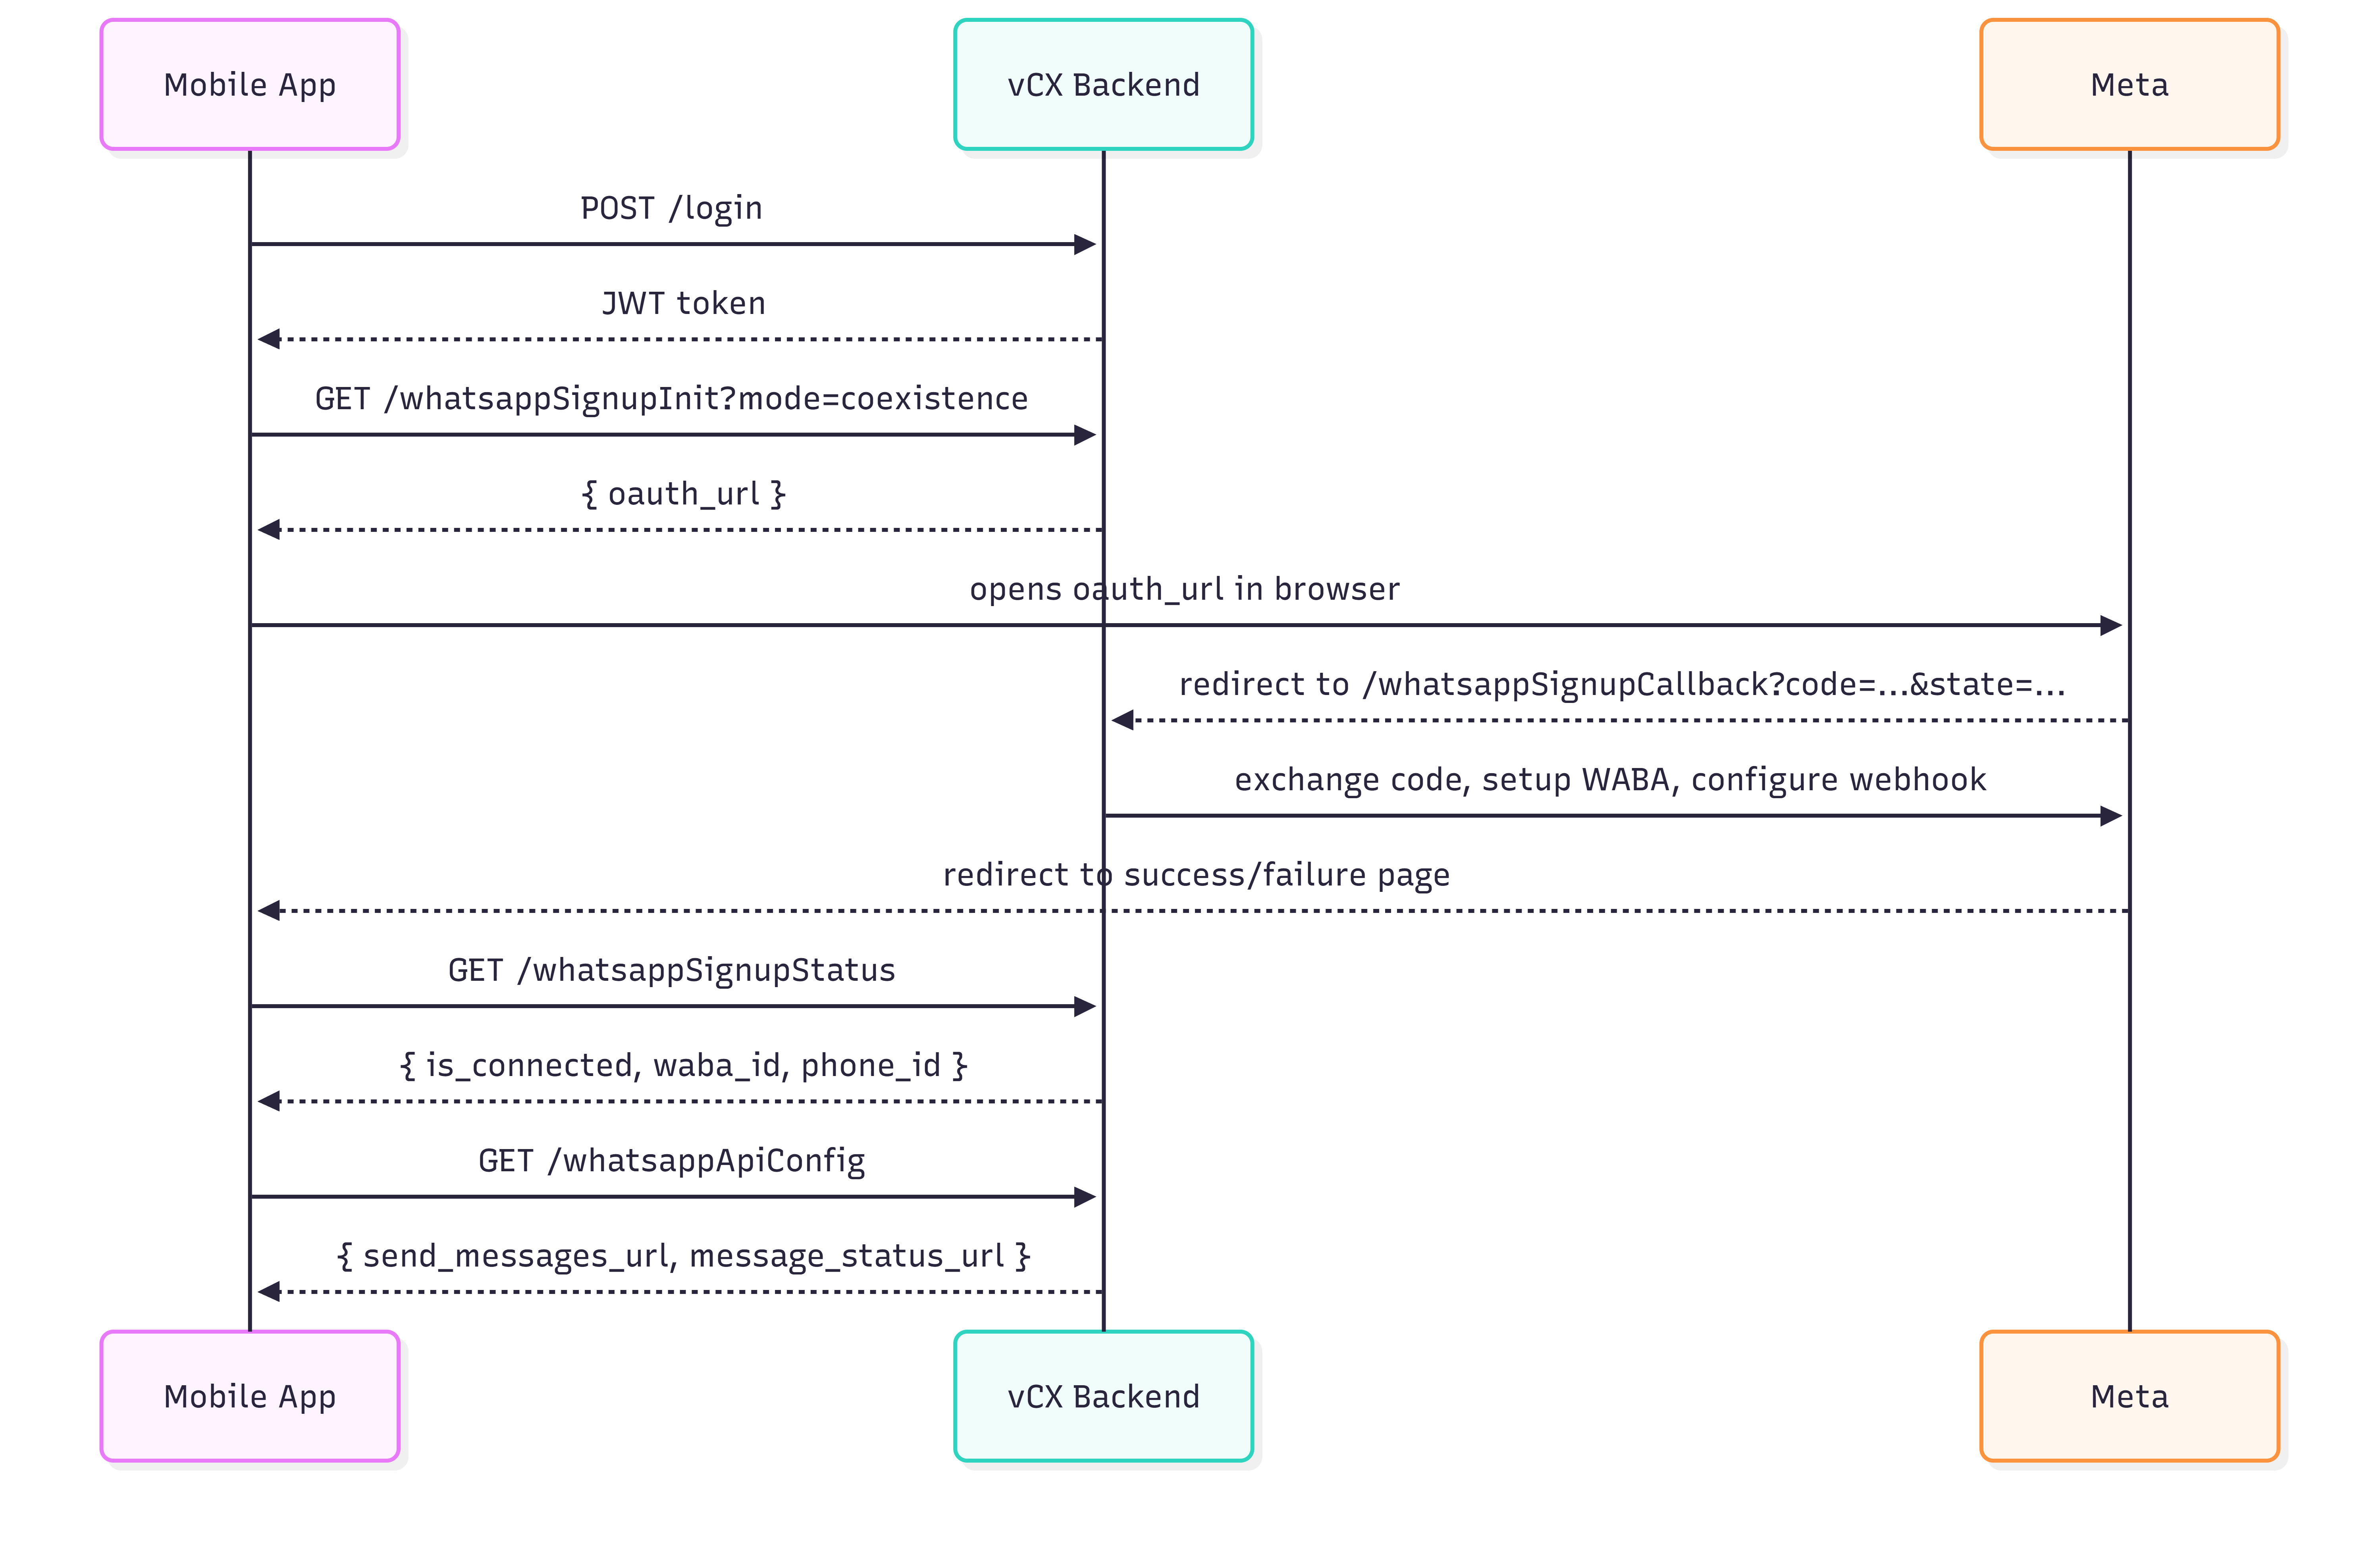
The mobile app never sees the Meta App ID. It asks the vCX backend for the OAuth URL, opens it in a browser, and polls for the result after Meta redirects back to vCX.
5a. Initiate WhatsApp Embedded Signup
GET https://backend.versalence.online/api/v2/whatsappSignupInit?mode=coexistence
Authorization: Bearer <vCX_JWT_TOKEN>
Query parameters:
| Parameter | Required | Values | Default | Description |
|---|---|---|---|---|
mode |
No | standard, coexistence |
standard |
WhatsApp onboarding mode. Use coexistence if the customer wants to keep their existing WhatsApp Business app running alongside vCX. |
Response:
{
  "success": true,
  "data": {
    "oauth_url": "https://www.facebook.com/v20.0/dialog/oauth?client_id=...&redirect_uri=...&scope=whatsapp_business_management&response_type=code&state=...",
    "state": "<STATE_TOKEN>",
    "redirect_uri": "https://backend.versalence.online/api/v2/whatsappSignupCallback",
    "scope": "whatsapp_business_management",
    "mode": "coexistence"
  }
}
Mobile app action: Open oauth_url in an in-app browser or WebView. Do not extract or store the Meta App ID.
5b. Meta OAuth callback
After the user completes Meta’s flow, Meta redirects the browser to the vCX backend. The mobile app does not call this endpoint directly.
GET https://backend.versalence.online/api/v2/whatsappSignupCallback?code=<META_AUTH_CODE>&state=<STATE_TOKEN>What the backend does:
- Exchanges the code for a Meta access token.
- Resolves the WABA ID and phone number.
- Registers the phone number.
- Configures the vCX webhook.
- Persists the account.
- For
coexistencemode, requestssmb_app_state_syncandhistorysync from Meta.
On success, the browser is redirected to:
https://backend.versalence.online/whatsapp-signup-successOn failure:
https://backend.versalence.online/whatsapp-signup-failure?error=<ERROR_MESSAGE>These redirect URLs are configurable via environment variables.
5c. Check WhatsApp signup status
The mobile app should poll this endpoint after the browser is redirected back.
GET /api/v2/whatsappSignupStatus
Authorization: Bearer <vCX_JWT_TOKEN>
Not connected response:
{
  "success": true,
  "message": "No WhatsApp account connected",
  "data": {
    "is_connected": false,
    "onboarding_mode": "standard"
  }
}
Connected response:
{
  "success": true,
  "message": "WhatsApp account connected",
  "data": {
    "is_connected": true,
    "onboarding_mode": "coexistence",
    "is_active": true,
    "waba_id": "...",
    "phone_id": "...",
    "phone_number": "919876543210",
    "display_phone_number": "+91 98765 43210",
    "webhook_subscription_status": "subscribed",
    "expires_in": "...",
    "last_message_at": null,
    "last_smb_message_echo_at": null,
    "last_history_at": null,
    "last_smb_app_state_sync_at": null
  }
}
This endpoint can be queried at any time in the future to check whether WhatsApp is still connected.
6. Get messaging API configuration
GET /api/v2/whatsappApiConfig
Authorization: Bearer <vCX_JWT_TOKEN>
Response:
{
  "success": true,
  "data": {
    "send_messages_url": "https://api.versal.one",
    "create_templates_url": "https://api.versal.one",
    "message_status_url": "https://apiproxy.versal.one"
  }
}
Use these endpoints (documented separately) to send messages, create templates, and check message delivery status.
7. Existing account lookup (backward-compatible)
GET /api/v2/getWaba
Authorization: Bearer <vCX_JWT_TOKEN>>
This existing endpoint continues to work and returns the connected WhatsApp account data. The mobile app may use either /getWaba or /whatsappSignupStatus.
Onboarding modes
Standard mode
GET /api/v2/whatsappSignupInit?mode=standard- Uses the Meta Cloud API onboarding.
- The customer’s WhatsApp Business app will be replaced by vCX for business messaging.Coexistence mode
GET /api/v2/whatsappSignupInit?mode=coexistence- The customer’s existing WhatsApp Business app continues to work.
- vCX receives messages through webhooks while the customer keeps using their native WhatsApp Business app.
- The backend requests
smb_app_state_syncandhistorysync from Meta during onboarding.
Environment variables
Add these to the vCX backend .env:
# Backend-driven OAuth signup flow for external mobile apps.
# WHATSAPP_OAUTH_REDIRECT_URI must be registered in the Meta app settings.
WHATSAPP_OAUTH_REDIRECT_URI=https://backend.versalence.online/api/v2/whatsappSignupCallback
WHATSAPP_OAUTH_SUCCESS_REDIRECT=https://backend.versalence.online/whatsapp-signup-success
WHATSAPP_OAUTH_FAILURE_REDIRECT=https://backend.versalence.online/whatsapp-signup-failure

# External WhatsApp messaging API endpoints exposed to mobile apps.
WHATSAPP_SEND_MESSAGES_URL=https://api.versal.one
WHATSAPP_CREATE_TEMPLATES_URL=https://api.versal.one
WHATSAPP_MESSAGE_STATUS_URL=https://apiproxy.versal.one
The following existing variables are also used:
APP_ID=
APP_SECRET=
META_API_VERSION=
Prerequisites
- The customer account must already exist in vCX (created as a sub-account under the partner’s master account).
- The customer must have an admin user with verified email and active account status.
- The
WHATSAPP_OAUTH_REDIRECT_URImust be registered in the Meta app settings. - Migration
009_add_whatsapp_coexistence_support.sqlmust be applied to production. It creates theonboarding_sessionsandwhatsapp_accountstables required by the new flow.
Coexistence with the existing web dashboard flow
The existing web dashboard flow is unchanged and continues to work:
POST /v2/whatsappSignPOST /v2/whatsappWabaPOST /v2/whatsappPhonePOST /v2/embeddedSignupGET /v2/getWabaGET /v2/whatsapp-coexistence/status
The new mobile-app flow is additive:
- GET /v2/whatsappSignupInit
GET /v2/whatsappSignupCallbackGET /v2/whatsappSignupStatusGET /v2/whatsappApiConfig
The removed /v2/whatsapp-coexistence/enable and /v2/whatsapp-coexistence/disable endpoints are no longer needed because the mode is passed directly at signup time.
Error handling
| Step | Typical failure | How the mobile app should handle |
|---|---|---|
| Login | Invalid credentials | Show error and ask user to retry. |
| Initiate signup | Missing APP_ID / redirect URI |
Backend misconfiguration. Contact vCX support. |
| Meta OAuth | User cancels | Browser redirects to failure page. Poll /whatsappSignupStatus to confirm not connected. |
| Callback | Invalid/expired state |
Browser redirects to failure page with error=Invalid or expired onboarding session. |
| Callback | Missing WABA or phone number | Browser redirects to failure page. User must retry signup. |
| Status polling | is_connected: false |
Continue polling or restart signup. |
Summary of API endpoints
| Endpoint | Method | Auth | Purpose |
|---|---|---|---|
/api/v2/login |
POST | Public | Authenticate and get JWT. |
/api/admin/v2/adminLogin |
POST | Public | Agency owner login. |
/api/admin/v2/getCustomers |
GET | Agency JWT | List sub-accounts. |
/api/admin/v2/clientAgentLogin |
GET | Agency JWT | Get sub-account JWT. |
/api/v2/getWaba |
GET | Any JWT | Check WhatsApp account. |
/api/v2/whatsappSignupInit |
GET | Admin JWT | Get Meta OAuth URL. |
/api/v2/whatsappSignupCallback |
GET | None (Meta calls this) | Complete signup after Meta OAuth. |
/api/v2/whatsappSignupStatus |
GET | Any JWT | Check if WhatsApp is connected. |
/api/v2/whatsappApiConfig |
GET | Any JWT | Get messaging API URLs. |
Appendix: Web dashboard 3-step flow
The following endpoints are used by the existing vCX web dashboard. They remain available but are not used by the mobile-app OAuth flow described above.
A1. Exchange code for access token
POST /api/v2/whatsappSign
Authorization: Bearer <JWT_TOKEN>
Content-Type: application/json

{
  "code": "<META_AUTH_CODE>",
  "mode": "coexistence"
}
Response:
{
  "success": true,
  "message": "Access token updated successfully",
  "session_id": "<SESSION_ID>",
  "mode": "coexistence",
  "data": "<ACCESS_TOKEN>"
}
Save session_id and discard data (legacy field).
A2. Resolve WABA ID
POST /api/v2/whatsappWaba
Authorization: Bearer <JWT_TOKEN>
Content-Type: application/json

{
  "session_id": "<SESSION_ID>"
}
Response:
{
  "success": true,
  "message": "WABA ID updated successfully",
  "data": {
    "waba_id": "<WABA_ID>"
  },
  "session_id": "<SESSION_ID>"
}
A3. Resolve phone number and complete signup
POST /api/v2/whatsappPhone
Authorization: Bearer <JWT_TOKEN>
Content-Type: application/json

{
  "session_id": "<SESSION_ID>"
}
Response:
{
  "success": true,
  "message": "Whatsapp embedded signup complete with co-existence mode",
  "mode": "coexistence",
  "phone_number": "919876543210",
  "phone_id": "<PHONE_ID>",
  "webhook_config": "Webhook configured successfully"
}
Role requirement: Admin only for all three steps.
Send messages via vCX
Once onboarding is complete, use the separately documented messaging API to send WhatsApp messages through the vCX platform.
The backend stores the access token and phone ID, so the send-message API only needs the vCX customer JWT (and the recipient/message payload).
Important notes
- Legacy endpoint
POST /api/v2/embeddedSignupexists as a single-call onboarding flow, but it always usesstandardmode and does not support Coexistence. Use the 3-step flow in the appendix for Coexistence via the dashboard. - Token storage: The 3-step flow uses
session_idto keep the Meta access token server-side. The mobile-app OAuth flow keeps the token entirely server-side. - No login to vCX web UI required: The mobile app can perform the entire flow via the API calls above.
WhatsApp Coexistence - FAQs
WhatsApp Coexistence allows a business to continue using its existing WhatsApp Business App while connecting the same phone number to the WhatsApp Business Platform Cloud API.
Previously, businesses generally had to choose between using the WhatsApp Business App or moving their number to the WhatsApp Business Platform.
With Coexistence, both can work together using the same business phone number.
This means your team can continue using the familiar WhatsApp Business App while your connected business platform can also send and receive supported WhatsApp messages through the API.
Coexistence is useful when a business already has an active WhatsApp Business number and does not want to stop using the WhatsApp Business App.
No.
The main purpose of Coexistence is to allow your existing WhatsApp Business App number to also connect to the WhatsApp Business Platform.
You should be a WhatsApp Business App user and should use the same business phone number during the Coexistence onboarding process.
No.
After successful Coexistence onboarding, the WhatsApp Business App remains available.
You can continue using the app while the connected business platform also communicates through the same WhatsApp number.
This is one of the main differences between Coexistence and a traditional migration to the WhatsApp Business Platform.
No.
Your existing conversations remain available in your WhatsApp Business App.
Yes.
Coexistence should not be considered a complete replication of every WhatsApp Business App feature inside an API based platform.
Important points include:
- Only supported conversations and message events are synchronized through the Cloud API.
- Some functionality available inside the WhatsApp Business App may not be available through the API.
- Historical message synchronization can be limited.
- Some activity from companion devices may not generate the same API events as activity from the primary WhatsApp Business App.
- API initiated messaging must follow WhatsApp Business Platform messaging rules.
- Business initiated conversations outside the customer service window require approved message templates.
- Meta may change Coexistence capabilities and restrictions over time.
The WhatsApp Business App should therefore continue to be used for app specific functionality, while the connected platform can handle automation, CRM workflows, customer management and API based messaging.
Verify, then trust the connection.
During onboarding, you will normally be taken through Meta's official WhatsApp onboarding process.
You will typically:
- Log in using your Facebook account.
- Select or create the correct Meta Business Portfolio.
- Select or create the appropriate WhatsApp Business Account.
- Choose to connect your existing WhatsApp Business App number.
- Confirm the business phone number.
- Follow the instructions shown inside your WhatsApp Business App.
- Authorize the connection.
- Complete any requested conversation synchronization.
Once completed, the same phone number can operate through both the WhatsApp Business App and the WhatsApp Business Platform.
Yes.
After onboarding, complete the steps by checking your Meta Business Portfolio.
Go to:
OR
to verify their business, it may take some days to get your business verified — keep check for status on the same link https://business.facebook.com/settings/latest
Make sure you are viewing the same Business Portfolio that was selected during WhatsApp onboarding.
You should review:
- Business information
- Business verification status
- Business phone number
- WhatsApp Business Account
- WhatsApp phone number
- Users and permissions
- Billing information where applicable
Ensure billing is setup:
If your Business Portfolio is not already verified and Meta makes verification available, complete the Business Verification process.
From Meta Business Settings, look for:
Security Center → Business Verification
Meta may request information such as:
- Legal business name
- Registered business address
- Business telephone number
- Business website
- Business email
- Company registration information
- Supporting business documents
The information submitted should match your official company records as closely as possible.
Business Verification helps Meta establish the identity of the organization operating the Business Portfolio.
Verification may also be required for certain Meta products, account capabilities, increased messaging usage or additional business features.
A business should therefore complete verification when Meta makes the process available.
If the verification option is not currently visible, that does not necessarily indicate a problem.
Yes.
After onboarding, go to:
Then review your Business Info.
Make sure the official company phone number is present and correct.
Also verify:
- Legal business name
- Registered address
- Business website
- Business email
- Business telephone number
Where possible, these details should match the information appearing on your company registration documents and website.
This is separate from the WhatsApp number itself.
The Business Portfolio should contain the company's official business information, while WhatsApp Manager contains the WhatsApp Business Platform phone number.
Open WhatsApp Manager from your Meta Business Portfolio.
Then open the section containing your WhatsApp phone numbers.
Your connected WhatsApp Business number should appear there.
Check that:
- The correct phone number is displayed.
- The correct WhatsApp Business Account owns the number.
- The business display name is correct.
- The number shows as connected or active.
- There are no warnings requiring action.
The WhatsApp display name is the business name customers see in association with your WhatsApp Business number.
Meta has specific requirements for WhatsApp Business display names.
Your display name should accurately represent your company, business or brand.
You can review the display name from WhatsApp Manager by selecting the relevant phone number.
If Meta requires approval of the display name, allow the review process to complete before assuming there is an account problem.
The display name can be reviewed from WhatsApp Manager by selecting the relevant phone number. Any change is subject to Meta's review process and display name requirements.
If Meta requires approval of the display name, allow the review process to complete before assuming there is an account problem.
Where a change is needed, submit the new display name from WhatsApp Manager and allow the review process to complete.
Reversible, but not without consequence.
Yes.
Connecting through Coexistence does not mean the number is permanently tied to the API connection.
The WhatsApp Business Platform connection can be disconnected later.
However, disconnecting should be done carefully because any CRM, automation, AI assistant, support platform or API workflow using the number may stop functioning.
When the API connection is disconnected:
- The connected CRM or customer engagement platform may no longer receive new WhatsApp conversations.
- API based outbound messages will stop.
- WhatsApp automations using the Cloud API will stop.
- Message templates sent through the API will stop.
- Integrations connected to WhatsApp may stop receiving message events.
Your WhatsApp Business App may continue to operate depending on how the disconnection was performed.
Before disconnecting, confirm which systems currently depend on the API connection.
The exact interface can change as Meta updates WhatsApp Business App and WhatsApp Manager.
Coexistence users can be managed through the WhatsApp Business App, WhatsApp Manager or the platform through which Coexistence was originally connected.
You can review your WhatsApp account from:
Meta Business Settings → Accounts → WhatsApp Accounts
and from:
WhatsApp Manager → Phone Numbers
A disconnected number can usually return.
Yes.
A WhatsApp Business App number that has been disconnected can generally be connected again through the supported Coexistence onboarding process, provided that the account and phone number remain eligible.
You should normally reconnect using the same Business Portfolio and WhatsApp Business Account that previously owned the number.
The safest approach is to start the WhatsApp Coexistence onboarding process again from the connected business platform.
You will normally:
- Start the WhatsApp connection process.
- Log in to Facebook.
- Select the correct Meta Business Portfolio.
- Select the appropriate WhatsApp Business Account.
- Select your existing WhatsApp Business App number.
- Authorize the connection.
- Complete any confirmation requested inside the WhatsApp Business App.
- Allow conversation synchronization where available.
- Confirm that the phone number appears correctly in WhatsApp Manager.
- Test sending and receiving messages from both sides.
Do not immediately remove the WhatsApp Business Account or phone number from Meta.
First complete the normal WhatsApp Business App registration process on the new or reinstalled device.
After registration, check whether your Coexistence connection is still active.
Then test:
- Receiving a WhatsApp message.
- Replying from the WhatsApp Business App.
- Confirming that the message reaches your connected platform.
- Replying from the connected platform.
- Confirming that the response appears correctly in WhatsApp Business App.
If the API connection has been disconnected, complete the Coexistence onboarding process again.
Usually, no.
Deleting the WhatsApp number should not be the first troubleshooting step.
First check:
- Whether the WhatsApp Business App is working.
- Whether the phone number still appears in WhatsApp Manager.
- Whether your connected platform shows the WhatsApp connection as active.
- Whether the correct Meta Business Portfolio is being used.
- Whether permissions are still active.
- Whether billing is active where required.
- Whether there are any restrictions or warnings in WhatsApp Manager.
Deleting a phone number can turn a relatively simple integration issue into a more complicated onboarding or migration problem.
Yes, in many cases, but moving the number to another provider should be treated differently from simply disconnecting Coexistence.
A provider change may involve:
- Changing the integration.
- Changing the application connected to the WhatsApp Business Account.
- Migrating platform configuration.
- Reconfiguring webhooks.
- Reconfiguring templates or system integrations.
- In some cases, changing WhatsApp Business Account ownership.
Do not delete the number before confirming the correct migration process with the new provider.
A short operational discipline.
After onboarding, complete these checks:
- Open
https://business.facebook.com/settings/latest. - Confirm that you are inside the correct Meta Business Portfolio.
- Review Business Info.
- Ensure your legal business information is correct.
- Add or confirm your official business phone number.
- Check the Business Verification status.
- Complete Business Verification if Meta requires or permits it.
- Open WhatsApp Manager.
- Confirm that the correct WhatsApp Business Account is present.
- Confirm that the correct WhatsApp phone number is connected.
- Check your WhatsApp display name.
- Check for any warnings or restrictions.
- Review billing where applicable.
- Send a test WhatsApp message to the number.
- Reply from the WhatsApp Business App.
- Confirm that the conversation appears in the connected platform.
- Reply through the connected platform.
- Confirm that the response appears correctly in the WhatsApp Business App.
Once these checks are successful, the Coexistence connection is ready for normal operation.
Do not immediately delete the WhatsApp number, WhatsApp Business Account or Meta Business Portfolio.
First collect the following information:
- Your WhatsApp phone number.
- Your Meta Business Portfolio name.
- Your WhatsApp Business Account name.
- A screenshot of the error.
- The approximate time the problem occurred.
- Whether the WhatsApp Business App is still working.
- Whether messages are reaching the connected platform.
- Whether messages can be sent through the API.
This information helps determine whether the problem is related to:
- WhatsApp Business App
- Meta Business Portfolio
- WhatsApp Business Account
- Cloud API
- Billing
- Message templates
- Permissions
- Webhooks
- The connected CRM or platform
Think of it like this:
using the same WhatsApp business number.
Your business keeps the familiar WhatsApp Business App while gaining access to customer management, integrations, automation, AI and API capabilities through the WhatsApp Business Platform.
Speed is a function of correctness.
To ensure your API messages are delivered as quickly and reliably as possible, you need to make sure you are sending them under the correct WhatsApp messaging conditions and that your WhatsApp Business Platform account is fully set up for sending.
1. Use the correct messaging window
Messages are normally delivered immediately when you are inside the 24 hour customer service window after a customer messages you.
Outside this window, you must use an approved WhatsApp message template.
If an approved template is correctly used, it can be delivered immediately even when the 24 hour customer service window is closed.
2. Payment method and billing requirements
Meta may require a valid payment method for continued or increased usage.
Billing problems can result in:
- Message delivery failures
- Sending restrictions
- Account limitations
- Payment related API errors
A missing payment method therefore does not necessarily block every message immediately, but billing should be configured correctly to ensure reliable business messaging.
3. Ensure your billing setup is correctly configured
To avoid unnecessary sending failures:
- Add a valid payment method where Meta requires one.
- Ensure the WhatsApp Business Account is not in a restricted or unpaid billing state.
- Check your payment status.
- Check for billing warnings in Meta.
- Monitor any account usage or messaging limits.
If billing is not correctly configured, messages may fail or be rejected by the API.
4. Use approved templates for outbound messages
For messages sent outside the 24 hour customer service window:
- Use only approved WhatsApp message templates.
- Make sure the template is not pending approval.
- Make sure the template has not been rejected.
- Make sure you are using the correct approved template name and language.
- Ensure all required template variables are supplied correctly.
A payment method does not override WhatsApp messaging rules.
An unapproved or incorrectly constructed template can still fail.